Sunday, May 23, 2010

Side Job! OCImageworks

So, I was recently hired (via handshake) with a local production company who shoots primarily with Dslrs (!).

One of the owners is a long time photographer who saw a niche and we've been working together to build this, er, division.

At this point we've shot about four videos. The first one was a vignette on a local artist, Steven Hill.

I was one of two camera operators (yes, I used my 7D) and Brian Barrow Shot with a 5d. We used a Zoom for external sound. It was a LONG day of shooting. We had no plan, but I think it came out pretty nice. Cudos to Brian for the brilliant editing, and Steven Himself for the music.

Steven Hill: A Potter's Journey from OC Imageworks on Vimeo.

Saturday, May 22, 2010

Left 4 Dead The Movie

Not that anyone's asking me to...


Recently, my wife had our first child (Lucas!) Anyway, he's about three months old and when he eats at night we usually get our Left 4 Dead on. Yes, my wife rules. So if I were to make Left 4 Dead the movie, I'd cast the following people:


Jada Pinkett Smith as 'Rochelle',
Chi McBride as 'Coach'
Dean Winters as 'Nick'
Eric Ladin as 'Ellis'


This is before I went to IMDB and found out that Eric Ladin is already Ellis. And Rochelle Aytes, Hugh Dillon, and Chad Coleman would most likely all do great.

Totally random. Just thought I'd share.

Sunday, November 8, 2009

Using The 7D's Light Meter

Until the Magic Lantern hack comes out for the 7D we don't have those convenient zebra stripes to show us when we're overexposing our images. I just wanted to mention this fact for those who don't have any photography experience-and that is until you get zebras (maybe even after) use the light meter!

We shot for eight hours yesterday (all outside locations) and for everyshot I used the light meter with the camera pointed at my subject and changed my aperture for a proper exposure. Unfortunately it was bright and, I didn't have any ND's to knock out light. Plus, I was running at 100 ISO and I wasn't about to change my shutter speed from 1/50 (although for a few shots I used 1/500-which is about as fast as a film cameras shutter angle can go.

Now, I'm sure I blew out the sky in some of the shots, and I tried to bring the exposure back to see both the sky and the subject. That being said, I'm not sure there was anything I could have done about that with what I own. But the point is - I used the light meter, like I would when I was taking still images. And most people that frequent this blog comes from a video background and I made this post because I haven't heard of anyone using the meter for video before. Probably because the people that know about it are like "Duh, why wouldn't I use that?"

This is an invitation if you aren't already at the party; use the light meter, it'll save your shots.

Monday, October 5, 2009

7D First Shoot


So I got my 7D on October 1st and haven't exactly gotten through the manual yet...that being said, I wasn't about to wait :)

Alright, bad news first: Friday night I went out to downtown Dubuque, IA at about 11pm with my sister Angelica Deming and we improvised a little ditty while I experimented with different ISO's. I found out afterwards that the changes ISO isn't a "liner progression". Link. (Thanks to hermmermferm from dvxuser for his chart.) There's some pretty noisy shots in this footage (at about 0:28 till 0:37) But, thanks to Michael Munkittrick's advise from the creativecow forum, it really helped cut down on the crazy noise. I think for those shots I was shooting at around 6400 ISO, but for the most part I was shooting between 1250 and 3200 ISO.

The only other thing (most likely user error) was during the editing I noticed some banding on a few clips. Now, I'm not sure if this was my fault (incorrect settings) or has something to do with the way the sensor writes the information.

Alright, that was the bad news. But for the most part, the ISO on this camera rocks. Coming from the land of HV20, it was such a great experience to have full manual controls. The image quality is outstanding, and I'm so proud of Canon for listening and giving us most of the goodies we asked for in one camera.

This was all shot with a shoulder rig and a Tameron 17mm to 50mm lens. I followed Stu's method of flattening the 5D for the 7D, which gave me a lot of wiggle room in post. I edited it in Adobe Premiere Pro (using Proxies) and then color corrected using the DV Rebel Tools in After Effects. All of the audio was in camera. Yes, I'm going to have to buy something to record audio separately-but I knew that going into it ;). Not sure if there's anything else to report. More later.

Tuesday, September 1, 2009

Canon 7D & My Soap Box

Yes. It's here. The camera of my dreams. True 1080p 23.966 recording with switchable frame rates for PAL and even 30p. Oh did I mention 720p at 60fps, full manual controls, and a number of other goodies.

I couldn't sleep last night I was so excited. I couldn't nap after work because the excitement continued. Honestly, my vision is blurry right now and I have the 7D to blame.

So now that this wet dream of a camera has been released, the question begs: what now? Well, film is what now. But then again, film has always been "what now". People are saying that film makers no longer have an excuse, but I would argue that we've never had an excuse.

Therefore, here's my plight to RED owner all the way down to the humble HV20 owner: you have a tool, go film something. I exhort thee, if you think you need to finish that next device before you can make your movie/documentary/commercial/music video/whatever; you don't. You have all you need.

That's all for now. Happy 7D day!

Saturday, August 15, 2009

Onlining the test shoot


I happened to get CS4 for a really great deal (thank you student discount!) and with it came Premiere Pro, Mocha For After Effects, After Effects, Photoshop, and a bunch of other really amazing programs. Now, I had used Sony Vegas Pro before I got my grubby fingers on this bundle of amazing goodness. And actually, I ended up using Vegas to do all of the audio tracking for this test shoot. I found Premiere Pros audio to be a bit clunky but in all fairness, I'm probably just used to Vegas. :)

Anyway, I had minor surgery on my foot a few weeks back and because my work requires me to have two feet, I was off for a few weeks. It was great! I was in a boot, grew a beard, and had time to delve into After Effects as well as Mocha.

Color Correction
As a test shoot, I learned to never, ever, ever have your talent wear black-black or white-white; especially when shooting against a white car! Gross. Also, green (grass, tress, etc) is a very hard color to work with. Next time, I'll be choosing my locations and clothing PRIOR to shooting.

Effects
I shot with my humble HV20 in Shutter Priory mode, and used a 1/250 shutter (except for one shot which I used 1/48 shutter).
Used After Effects to remove pulldown and edited everything in Premier Pro. I imported the Premiere Pro project into After Effects and made a different AE (after effects) project for each clip.

I was brand spankin' new to AE and for a while I felt totally overwhelmed. But, my saving grace was videocopilot.net. Especially Andrew's basic training. Also, the people on their forum are really cool and helpful. Again, the DV Rebels Guide was a huge help, and the people on the rebel forum were a huge help too. But really, After Effects should be looked at like an oil painter looks at his brush and oils-AE doesn't make what your working on awesome, you need to learn to move the brush and manipulate the colors, so to speak. And learning how to do that is a lot of work, and a lot of fun. I don't have it all figured out by any stretch, but I'm on my way. I think it's important to point out that when your tackling something like this, just take it one step at a time.

Motion Tracking
Mocha is a delicious beverage as well as an amazing motion tracking program made by Imagineer Systems. I used it to map the bullet holes on that white (grr!) Chevy Blazer. Obviously, you can use it for a lot more than that (just check out their sample videos!) This tutorial really made the Mocha workflow click for me.

Audio
The audio was so much fun to build. I didn't use any of the sound from the shoot except for one spot during the hand-to-hand fight. I built all of it from the ground up recording sounds and using a bunch of the resources from Freesound.org.
To be honest, I stole a bunch of the gunshot sounds from Rainbow 6 Vegas2 by recording the Left and Right out of my Xbox360. Even though that game has great sound, I found a lot of the gunshots didn't sound like gunfire, but instead sounded like, well, a video game! That being said, after some EQ work and track doubling I think I achieved some nice sounding gunshots.

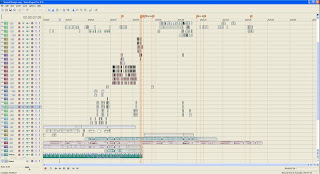
This is a screen grab from the audio build.
Monday, June 1, 2009

Test Shoot

I decided it was time to do an actual test shoot, and because I’m a guy who digs guns, and action in general-I decided on filming an action sequence that happened near the beginning of the first episode of the story I was working on. I knew it would be a challenge because this was one of the more complicated sequences; but I also knew that if I did it well, it might help convince others to get on board and generate excitement for the project.

Well, getting people on board was way easier than I imagined. I spent a few days slowly buying props on line, worried about getting the soldiers in the shoot to look somewhat authentic. I knew some people with realistic airsoft guns and they lent me some stuff. A buddy of mine with some actual military garb lent me a few things too which helped a lot; but the door really blew open when a friend of a friend (now just a friend) said he’d be interested in helping out. Turns out he had an arsenal of airsoft guns and gear. And just like that my props were all taken care of. My ‘Rodrigez list’ just grew exponentially.
So the day of the test shoot came, and everyone that showed up was needed. Not only that, but the shoot was long and difficult; mostly because I had no idea what I was doing. I just want to add that having the storyboards there with me helped me tremendously shot to shot. It also helped in showing everyone involved what we were trying to achieve for a specific shot as well giving everyone an idea how the entire scene progressed.

We shot for eight or so hours and it was much MUCH fun. I wouldn’t say it was easy…one of the shots took 27 takes (a hand to hand fight filmed on a dolly…and it’s a little less than three seconds long).

But we got it done and with daylight to spare. The crazy thing was, at the end of the day I thought those guys would never want to work with me again. I mean these guys spent their Saturday afternoon pushing dollies, moving gear, doing take after take…. But, to my surprise, each one called or texted me that night saying how much fun they had, and that they couldn’t wait to ‘do it again’.

PICS!